
Speed sends a webhooks message to notify your application when an event happens in your account. Webhooks are particularly useful for asynchronous events like when a customer makes a payment, you receive recurring payments, or when collecting subscription payments. It is imperative for Speed to know where to send event notifications. So you need to register webhook endpoints. Provide a publicly accessible HTTPS URL to deliver these notifications when registering your webhook endpoint so we can send unauthenticated POST requests. Therefore, ensure it is a secure (HTTPS) endpoint capable of handling webhook JSON payloads. You can register any amount of webhook endpoints with Speed. The URL must be in the standard format of https://(www.)domain.com/.
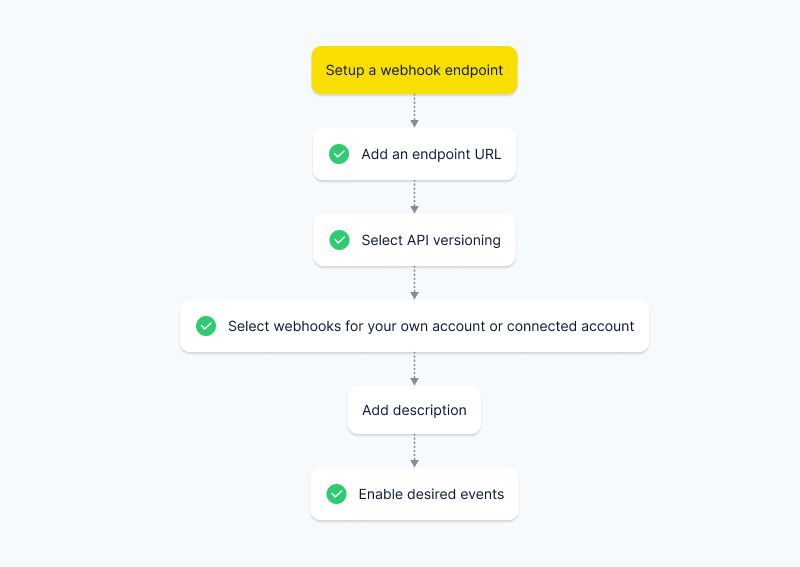
Set up a webhook endpoint using these steps:
-
Add endpoint URL.
-
Select API versioning
-
Add description
-
Choose webhooks for your own account or the connected account.
- When to choose your own account: If you prefer to receive webhooks exclusively for your account, you can opt for this choice. It will exclude notifications for events occurring in all connected accounts.
- By choosing this option, you can receive real time events of the modules which Speed allows you to create and manage through your own account.
- When to choose the connected account: If you wish to receive notifications for events in your connected account, you can select the connected account option. This will omit notifications for events taking place in your platform account.
- By choosing this option, you can receive real time events of the modules created or managed by your connected account.
Multiple platform accounts are associated with a single connected account:
When two separate platform accounts are linked to the same connected account and both subscribe to the connected account's webhooks, both will receive notifications or events related to the connected account, regardless of the originator of the checkout session.To learn more about Connect, click here.
Let’s check with an example of how the response of the webhooks will appear for the platform and the connected accounts:
Let’s assume there are,
- Platform accounts P1 and P2
- Both these platform accounts are associated with same connected account C1.Here both Platform accounts P1 and P2 has created connect webhook and subscribed for checkout_session.created event. Also, connected account C1 has created webhook for own account and subscribed for checkout_session.created.
Case 1- P1 creates the checkout session for C1 using P1’s key and C1’s account id-
- Platform account P1 and P2 will get data in webhook with account_id (C1) and the fields such as application_id, application_fee, and application_fee_percentage.
- Connected account will get data in webhook without account_id(C1) and with these fields such as application_id, application_fee, and application_fee_percentage.
Case 2- C1 creates the checkout session using its own C1’s key-
- Platform account P1 and P2 will get data in webhook with account_id(C1) and without the fields such as application_id, application_fee, and application_fee_percentage.
- Connected account will get data in webhook without account_id(C1) and without these fields such as application_id, application_fee, and application_fee_percentage.
- When to choose your own account: If you prefer to receive webhooks exclusively for your account, you can opt for this choice. It will exclude notifications for events occurring in all connected accounts.
-
Select events to receive their notification
-
Complete your webhooks integration by testing it in test mode.
-
After testing your webhook endpoint, register the endpoint in live mode, and you are all set.
Speed users will be able to enable the same events on multiple endpoints. Furthermore, you can add the same URL multiple times. While adding the endpoint, you can choose the version you want. You can select your version or the latest Speed version. Speed enables you to create Webhooks for both test and live modes.
Register an endpoint via Web application
You can configure webhooks in your Speed web app’s dashboard or using the APIs. Most users configure webhooks from the Speed web application, which provides a user interface for registering and testing your webhook endpoints.
To set up a webhook endpoint through the Speed web application, follow these steps:
- Log into your Speed web application with your login credentials.
- Navigate to Dashboard → Developers → Webhooks.
- On the left sidebar, click
Add endpoint. - Add your webhook endpoint’s HTTPS URL in the
Endpoint URL. - Choose webhooks for your platform account or the connected account.
- Enter a description.
- Select the version of your choice.
- Click
next. You will see a list of all events. Select your desired events. After selecting events, you can see the selected ones in the sample endpoint code on the Speed web application. - Click
Add endpoint. This will take you to the webhook detail page, where you can find the webhook endpoint status, secret, id, and many other details.
Set up a webhook endpoint via API
You can also programmatically create webhook endpoints. Let’s see the request and its parameters for the same.
Request
{
	"url": “string”,
	"description": “string”,
	"api_version": “string”,
	"enabled_events":[ “payment.created”, “payment.paid”],
	"connect":false
}
Request parameters
Provide the basic information outlined in the table below:
| Parameter | Required | Type | Description |
|---|---|---|---|
| url | ✅ | string | The webhooks-endpoint URL you want to use to receive notifications. |
| api_version | ✅ | string | You can send your version or the latest version in this parameter. |
| description | string | This parameter allows you to describe this webhooks endpoint. The description is an optional field, and you can use this parameter as you choose to do. The best practice is to use this to describe the usage of this particular endpoint. | |
| enabled_events | ✅ | Array of strings | Enable events by entering the event names in this parameter and receive real-time notifications for those desired events. Click here to know for which events we provide webhooks. |
| connect | ✅ | boolean | To receive notifications for the connected account, set this value to 'true'. If you prefer notifications for your own platform account, set it to 'false'. Until explicitly specified it will be considered as ‘false’. |
More information can be found in our API reference.